
The future is here!I present you the Ovo 11.
The most advanced vehicle as of 2150. A simple, fast, safe and personal way of travelling.
Controls:
↑ ↓ Arrows
Increase-Decrease wanted speed along Y axis (forwards - backwards)
← → Arrows
Rotate left-right
F-H Keys
Increase-Decrease wanted speed along X axis (left - right)
T-G Keys
Increase-Decrease wanted speed along Z axis (up - down)
These are the basic keys needed to control the vehicle. It might seem very difficult, but it isn't. Anyway, just start randomly pressing the keys and you'll learn to use it
Remember that this is not controlled at all like a car, neither like a plane. Up and down arrow keys increase and decrease your "target speed", this means, that, on release, the vehicle will remain at the speed you left it. Don't expect the vehicle to stop if you are not pressing any keys, it won't stop, it will remain at the same speed you left it unless you counteract the movement in some way.
Pairs of the above at the same time
Will stop the movement in that axis. -E.g. pressing Up and Down keys at the same time will stop the vehicle from moving forwards-backwards. Same applies for F+H and T+G along it's axis.
E Key
On/off global switch button. The vehicle starts by default in an 'off' state, so you will need to press E once to start moving!
Y Key
Resets all your speeds back to 0, it's kind of a really effective parking brake that works in 3 dimensions. Though it's not a toggle, you'll move again just by pressing any of the required keys, No need to press Y again!
P Key
Toggle on and off the "altitude lock" feature. Try it by yourself to understand it
Remember that this vehicle flies in 3 dimensions, don't expect it to go up-hill just by itself, you'll need to press the required keys in order to remain at the desired height above ground.
That's all you need to know for it's use in most cases
Advanced Commands:
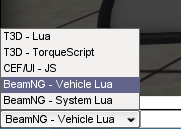
Make sure your console is set to 'BeamNG - Vehicle Lua' mode, otherwise any of the following will work.
(imported from here)
All of the commands need to have written 'ovo.' in front.
Any of the following tasks can be stopped at any time by pressing Y, or via the stop() command.
setAlt(alt) -- Makes the Ovo go to the desired altitude, (in meters) e.g.ovo.setAlt(1000) <-- climb to 1000 meters.
Keep in mind 0 meters is not always the ground! You'll end up crashing hard to the ground if you think so
setHdg(hdg) -- Makes the Ovo go to the desired heading (in degrees). Being 180 the direction you spawn.e.g. ovo.setHdg(90) <-- Rotate towards 90º.
setVy(vy) -- Sets the Ovo speed along the Y axis (forward - backward, same result as the Up-Down arrows), in m/s.e.g.ovo.setVy(50) <-- Move forward at 50m/s (180km/h)
setVx(vx) -- Sets the Ovo speed along the X axis (left- right, same result as the F-H keys), in m/s. e.g.ovo.setVx(-10) <-- Move left at 10m/s (36km/h)
setVz(vz) -- I hope you can guess how to use this command..
Now, here's where the fun starts, kind of
track(id) --Sets the Ovo in a 'mode' where it continuously rotates to look another vehicle. It tracks with it's sight another vehicle. You are still able to control the vehicle in the normal way, except your heading is locked towards the target vehicle.
id: should be the 'id' of the wanted target vehicle. In most cases it should be 0 or 1.
e.g.ovo.track(1) <-- Tracks another vehicle whose id is '1'.
follow(id, dist, alt) -- Sets the Ovo in a 'mode' where it continuously follows another vehicle. It becomes essentially a 3rd person view camera for other cars
id: Same as above
dist: Maximum distance from which to remain from the followed vehicle. In meters. A good value is 4. But the value can be changed on the go by just resending the command with a new distance. Never set it to 0, bad things might happen
alt: Height at which to hover above the followed vehicle altitude, so you don't scrape the ground
e.g.ovo.follow(0, 4) <-- Tracks vehicle 0 at a maximum of 4 meters.
goTo(x, y) -- Sends the Ovo to the specified x, y location. Same coordinate system as in the world editor.
e.g.ovo.goTo(0,0) <-- Sends the Ovo to the centre of the map.
stop() -- Same as pressing Y. Why would I want to type the command instead of pressing Y? I dunno. I'm just here to tell you the available commands...
Installation:
Drop the zip to (documents)/BeamNG.drive/mods Without extracting.
DO NOT RE-UPLOAD TO ANY SITE
Dismiss Notice

In the upcoming days mod approvals could be slower than normal.
Thank you for your patience.
In the upcoming days mod approvals could be slower than normal.
Thank you for your patience.
Outdated Ovo 11 - Intelligent Vehicle 1.6
The simple, fast, and safe way of travelling in the future.
Tags: